Git and GitHub by
Scoroncocolo
You probably know what Git is but for this who don't Git is a versioning tool that acts like a "time machine" for your code or the book you're writing
Instead of saving multiple files, Git maintains one file and tracks every revision you've made to it
But even if you aren't hacking code or writing a novel you should be interested in playing around with Git and GitHub simply because it's fun to do
"We’re here on Earth to fart around... we’re dancing animals" - Kurt Vonnegut
You don't need to be a wizard to make magic with Git and GitHub
Git Architecture and Workflow
Creating Working Directory with the Command Line
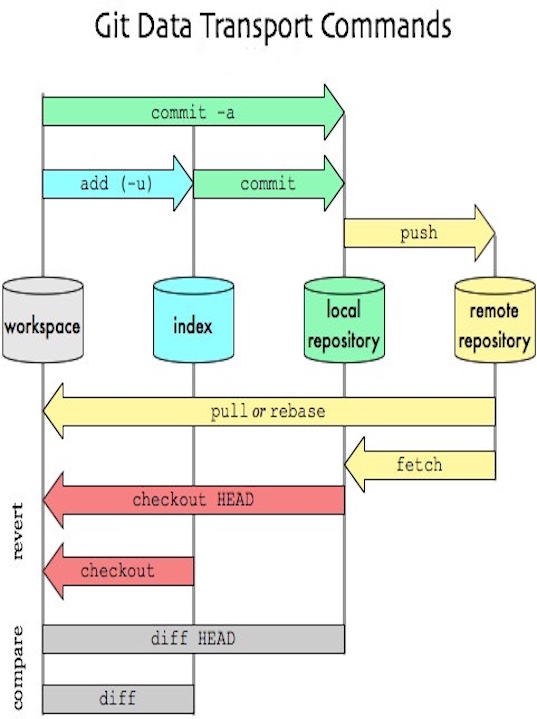
The best way to learn how Git works is to understand its three-stage architecture: the Working Directory (where you create and edit files), the Staging Area also known as Index (where you pretty things up and get rid of bugs), and the Local Repository (where your work is saved).
While some modern code editors like Visual Studio Code and JetBrains IDEs have built-in Git functionality that let you manage versions without leaving the editor, Git is primarily a Terminal/Command Line tool so lets jump right in and create our Git Working Directory or Git Folder using the command-Line
So open your Terminal app and maneuver to a place where you want your Git Workplace to live and type: mkdir git-one and hit your enter/return key to create a folder named git-one (or name it anything you like)
Now lets put some files in this new folder and any files will do but text files work best for testing
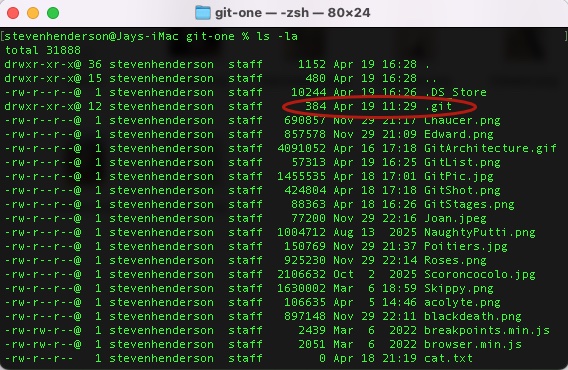
Finally, make absolutely certain that you are in this newly created folder/directory in the Terminal and type this: git init ( init means “initialize”) and hit Enter
And BAM! You've just created a Git Working Directory and from now on Git will monitor any changes you make to files inside this folder
To see this .git file you've just created along with all the other files in your new Working Directory type ls -a (meaning list all files in the directory including hidden files) and type your Enter key
Git Architecture and Workflow
continued
As we mentioned before, the folder where you’re working on your project is called the Working Directory and this is where you want to gather all the files you want to work with on your project
Modifications made to files in the working directory are considered 'untracked' until explicitly staged for commit
Once you've assembled all your files into the Working Directory it time to "stage" them or move them to the Git Staging Area
To to this make sure you are in the git-one directory in the Terminal and then type git add --all and type Enter/Return
Now all the files in your folder have been "staged" and will stay there until you commit them
Think of the staging area as a middle ground – a temporary space where files sit between your working directory and the final save in the repository and this is where you edit them and pretty them up so they are nice enough to show to the world
Once you have reviewed everything and you are sure everything is correct and looks nice, you “commit” them
To commit all of the files you have in the Staging Area type git commit -m "chaged text size" The -m flag lets you add a short message describing what you changed and in fact if you don't use the -m flag you will probable get an error message
After you've made the commit run this command: git status to check that all is well
If all changes have been committed, and there are no untracked files, the Terminal should say: nothing to commit, working tree clean.
Committing these "Staged" files means permanently saving them to your local repository and that means locking them in as a recorded version of your project’s history
Your local Git Repository is a place where all the versions of your files and their complete change history are stored. In the case of a local repository making them ready to be PUSHED to a remote repository that resides on a cloud server, like GitHub.
Getting Started with GitHub
Creating a GitHub Account
Open a browser and go to https://github.com and set up an account
After you have jumped through the test hoops to prove you are a human, GitHub will send an eight-digit launch code to the email address you provided so just copy the code from your inbox and paste it into the verification box on the GitHub website to finalize your account creation
The first thing you need to do is create a repository on the GitHub website which wll become your Git remote Repository so in the upper-right corner of any page click New and give your new repository a descriptive name
In the "Description" box, type a short description. For example, "This first repository is for practice purposes" then choose to make your repository Public and Select Add a README file
Click Create Repository and add some files to your new GitHub Repository by clicking Add File and choosing to Create a New File or Upload Files in which case you can drag some files in from your local machine
Once you have some files in your GitHub repository click Commit Changes to save them
Cloning GitHub Repository to Your Machine
Now to your Terminal and in the command line navigate to your Desktop or wherever you want your cloned repository to live and leave the command line blinking in that directory/folder while you go back to the GitHub site and click on the green Code button and copy your Repository's URL
Now back in your Terminal's command line typ: git clone (paste the URL) then the Enter/Return key and BAM! your new remote GetHub repository pops into existence
How to Push Git Files to GitHub
Your local Git Repository is a place where all the versions of your files and their complete change history are stored. In the case of a local repository making them ready to be PUSHED to a remote repository that resides on a cloud server, like GitHub.
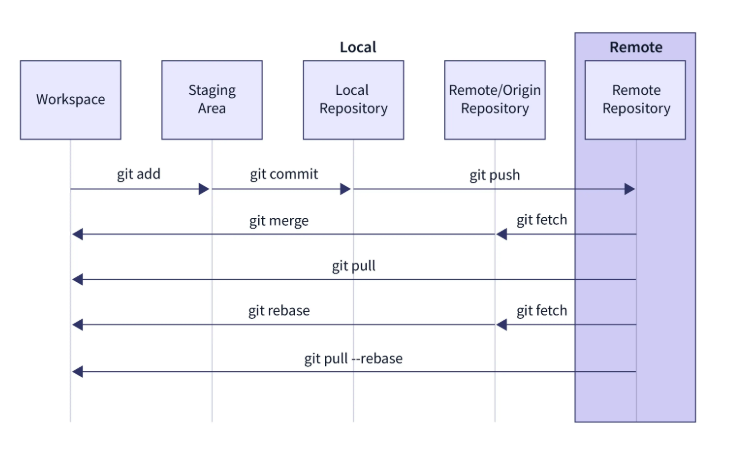
At this point, you have two repositories – one on the cloud (GitHub), and another one locally on your computer and now you can exchange and update files back and forth between them by using Git's Push and Pull commands
Add the file or files, commit the file then push the file to Github with the Terminal command git push origin main
git push uploads your local commits to a remote repository like GitHub, while git pull downloads changes from a remote repository and merges them into your local branch.
The git push command takes two arguments: A remote name, for example, origin and a branch name, for example, main so you will usually run git push origin main to push your local changes to your GitHub repository
You have to commit your changes on your local Git Repository before you can push them to GetHub
Pull Files from GetHub
To get the latest changes that you may have made to files on GitHub or the latest files you may have created there run this: git pull origin main
Thanks for reading this little tutorial on Git and GitHub and if yoy have any questions or comments fill free to hit me up

- mkdir Data Makes a new, empty folder/directory named Data
- touch dog.txt Creates a new empty file named dog.txt
- pwd prints the path of the directory you are currently in
- ls lists all files in the current directory/folder
- ls -a list all files including hidden files
- ls -l long listing of all files showing owner, size and time last edited
- ls -R Recursive: Lists everything in the current folder and all subfolders
- ls .. list the contents of the parent directory one level above
- mv oldname.txt newname.txt renames files
- rm filename.txt (remove) permanetly deletes files (caution there be dragons) there is no cmd + Z or undo
- rm -r DeadFolder remove/delete a directory/folder and all of its contents (files and sub-directories) permenatly
- cat AnyFile.txt prints out the entire text of the file
- head AnyFile.txt prints the first 10 lines of specified file
- tail AnyFile.txt prints the last 10 lines of specified file
- echo "Arf! Arf!" > dog.txt replaces any existing text with Arf Arf
- echo "Arf! Arf! Arf!" >> dog.txt adds text below existing text on dog.txt
- cp copies files or folders from one location to another
- say "Everything not forbidden is compulsory" hear your machine speak to you
- say -f filename.txt Reads the contents of a specific text file aloud
- history lists a history of your last 16 (in ZSH/macOS) commands
- history 5 lists your last 5 commands (specify any number you want) and you can use your up arrow to bring them to the command prompt
- open -a "Sublime Text" dog.txt will open the file in Sublime Text (substitute your code editor) if it is installed on your machine
- git init initiate a new repository
- git clone (url) download a remote repository to your local machine
- git config Sets your identifying information (username and email)
- git status show modified files in working directory, staged for your next commit
- git log Displays the history of all commits
- git diff changes in the working directory that are not yet in the index (Staging Area)
- git ad -all adds all files to the staging area
- git commit --m commit all files in staging area and include an explanatory message
- git commit --dry-run previews what would be included in your next commit without actually creating a new commit record
- git reset unstage all staged files back to Working Directory
- git remote -v list the current remote repository you're using
- git push transfers committed changes to remote repositories making them accessible to others
- git pull retrieves the latest commits from the remote, updating the local repository with the changes made by others
- Control + C: to stop or "kill" a process that is currently running
- Command + K to clear the screen or typing clear works the same way
Thanks for the visit


