Pixelmator
Facial Adjustments
These are the twelve easy steps to make your subject beautifull so follow me like a panther

Facial Adjustments
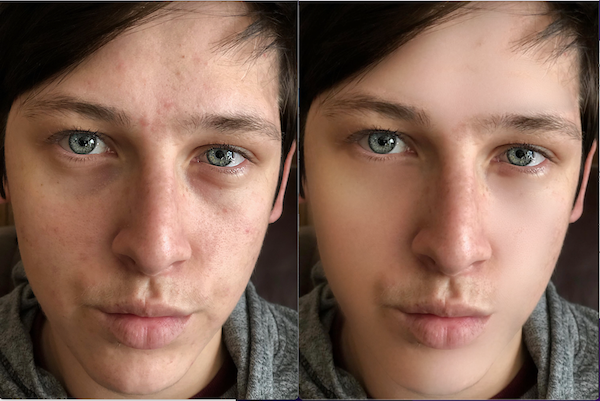
Using a combination of a High Pass filter along with a Low Pass filter has long been a photography editor's preferred way of giving their models perfect facial complexions. And for a long time Pixelmator Pro has had the High Pass effect and fairly recently it added Low Pass to it Effects tools and even joins the two together in it's new Frequency Separation tool but just using these two effects together without any blending, bluring and masking gives the image an unnatural looking airbrushed look
Here's a far better way to do it using Gaussian blur as your low-pass filter to be used along with the High Pass effect that's been a filter available in Pixelmator Effects tool from the very beginning. We'll also use a couple of blend modes that change how a top layer blends with the layers below it. And we'll use an empty layer that will be painted entirely gray
This gray layer will have some "noise" added to it along with a little Gaussian Blur that will mimic human skin color and texture
So are you ready let's do this
Smooth Skin Facial
Twelve easy steps. Come on this'll be fun I promise so follow me like a panther
- 1) Load your image into Pixelmator Pro and duplicate it (cmd J) twice so that you have three layers of your image
- 2) Disable the visibility of the middle layer by un-checking it and double-click inside it's title box and re-name it "Adjust"
- 3) Select the top layer go to Effects (F) and type "High Pass" into it's search box then click it and adjust it to 2.5 px and keep opacity 100%
- 4) With the top layer still selected change Blend in the rectangular box above your image layers that now reads "Normal" to "Linear Light"
- 5) Turn back on visibility to middle layer and go to Effects (F) Effects and choose Gaussian Blur and change its value to 15 px
- 6) Create an empty layer (+ inside a circle) and go to Color Fill (N) and fill it with gray 50% on gray scale slider
- 7) With the empty gray layer selected go to Effects and click Convert Layer to make the layer a shape to edit it
- 8) Search for "Noise" and click it and set it to 30% and then click "Gaussian Blur" and put it at 8 px
- 9) Hold Shift to select the top three layers then right-click one them an choose Group to make them all one layer with the original image layer beneath them
- 10) Select the group you just made right-click and hold opt key while clicking Add Mask then click Done
- 11) Go to Paint (B) and choose WHITE and WITH THE MASK SELECTED paint every inch of the face but the eyes and lips (watch the mask to see if you've painted everything)
- 12) Click to expand the group and select the bottom layer of Group that you named "Adjust" go to Effects and move Gaussian Blur slider to the right and BAM!
Now continue brushing white paint on the Mask if you want
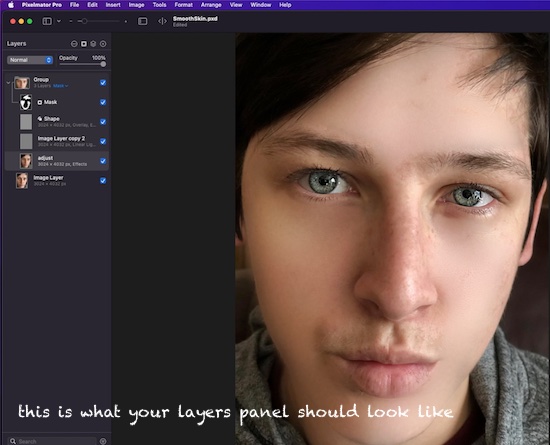
The image below shows what your Layers Panel should look like if you've followed me like a panther
You can watch a video I made and put on YouTube that will give you a detailed visual of all of the above twelve steps
