The Command Line
Scoroncocolo
I think the Command Line or Terminal on your Mac or Windows machine should be treated like a video game as in make it fun to see how good you can get at it
It is sort of thrilling because it could be dangerous if you are not careful sort of like being a spy behind enemy lines or a tightrope walker high in the sky with no net beneath you
Have fun but be careful - There Be Dragons!
On a Windows machine press the Windows key, type "cmd" or "command prompt," and press Enter and BAM!
On a Mac open Applications > Utilities > Terminal, or use Spotlight search (Cmd + Space) and type "terminal" BAM!
On a Mac you can you can r-click any folder in Finder and choose "New Terminal at Folder" and the command line will open with the prompt blinking on that folder (directory)
There are four primary shells that can run the Terminal on your Mac or Windows PC and they are Windows Power Shell, Bash (Bourne-Again Shell), zsh (Z Shell) and Fish (Friendly Interactive Shell)
You can think of shells as Operating Systems for your Terminal and all four will run pretty much the same commands on the Command Line in your Terminal app on your Mac or PC
The zsh shell is the default shell for all modern versions of macOS
I've recently written an article about the Fish Shell
The Fish (Friendly Interactive Shell) is more fun and easier to work with than the other three shells so go read my piece on Fish and I'll show you how easy it is to install and use
Moving Around
Think of the Directories on your machine like an upside down tree with the root Directory at the top and all your other directories/folders branching from it
The root directory is denoted by a forward slash in the Terminal (/) and the first directory below the Root Directory is the Users Directory
And next is the Home Directory /Users/username on macOS or C:\Users\username on a PC and that is the location you will find yourself in when you open a fresh Terminal/Command Line session
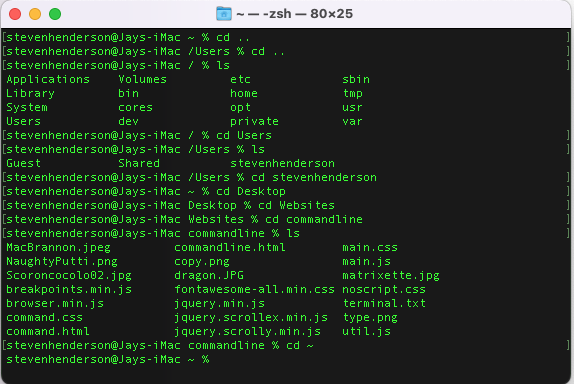
Lets start in a directory where this webpage was born - a folder inside another folder that is on my Desktop that I've named, appropriately enough, "commandline"
If you were in that directory in the terminal on my Mac and you typed pwd here is the output you would get /Users/stevenhenderson/desktop/websites/commandline which is the Path of the directory in which we are currently in and the command pwd stands for Print Working Directory
And you'll notice that the command prompt is flashing at the end of the word "commandline" which means the Terminal is waiting for another command to be typed so lets type cd .. and hit Enter and now we are one directory up at /Users/stevenhenderson/Desktop/Websites
In the Terminal cd means Change Directory and the command cd .. tells the Terminal to change directories to move up one level in the file directory tree, from your current folder to its "parent" folder, and the command cd ../.. would mean move up two levels
Now that we are at /Users/stevenhenderson/Desktop/Websites type ls and hit Return/Enter and the output will be a list of files because the command ls tells the Terminal to list the files in the current directory
In that list you'll see our old friend "commandline is listed as one of the directories in the list of files so type commandline and hit Enter/Return and you'll be brought right back to /Users/stevenhenderson/desktop/websites/commandline because you can get to any directory you see in that list by typing cd and the name of that folder/directory
Had you typed "desktop" into the command line instead of "commandline" the output would be cd: no such file or directory: desktop Of course that's silly because we know there is a directory named desktop but the Terminal insists we play by its rules and either enter the full path to desktop which is /Users/stevenhenderson/desktop or use the command cd ../.. to move up two levels to /Users/stevenhenderson and from there you can type cd desktop> and Bam! you're there
When you are in a directory and you use the ls command to view the files and folders in that directory you can simply type the name of any directory in that list and hit Enter to go to that directory and a cool thing is you don't have to type the whole word just type the first couple of letters and hit the Tab key and the Terminal will complete the word for you
You should get used to using this handy auto-complete when navigating the command line
For instance if I start at /Users and want to get to my commandline directory I can type cd st and hit the tab key then cd de tab then cd we tab and com tab and suddenly I"m at /Users/stevenhenderson/desktop/websites/commandline
To quickly move to your Home Directory type cd and the symbol that is called tilde or cd ~
To move quickly to the root directory type cd /
cd .. to go to the parent of your current folder
cd ~ or just cd to jump back to your user’s home directory
cd / to go to the very top of your file system
cd ../.. to move up two levels
cd ../../.. to jump up three levels from your current location
- mkdir Data Makes a new, empty folder/directory named Data
- touch dog.txt Creates a new empty file named dog.txt
- pwd prints the path of the directory you are currently in
- ls lists all files in the current directory/folder
- ls -a list all files including hidden files
- ls -l long listing of all files showing owner, size and time last edited
- ls -R Recursive: Lists everything in the current folder and all subfolders
- ls .. list the contents of the parent directory one level above
- mv oldname.txt newname.txt renames files
- rm filename.txt (remove) permanetly deletes files (caution there be dragons) there is no cmd + Z or undo
- rm -r DeadFolder remove/delete a directory/folder and all of its contents (files and sub-directories) permenatly
- cat AnyFile.txt prints out the entire text of the file
- head AnyFile.txt prints the first 10 lines of specified file
- tail AnyFile.txt prints the last 10 lines of specified file
- echo "Arf! Arf!" > dog.txt replaces any existing text with Arf Arf
- echo "Arf! Arf! Arf!" >> dog.txt adds text below existing text on dog.txt
- cp copies files or folders from one location to another
- say "Everything not forbidden is compulsory" hear your machine speak to you
- say -f filename.txt Reads the contents of a specific text file aloud
- history lists a history of your last 16 (in ZSH/macOS) commands
- history 5 lists your last 5 commands (specify any number you want) and you can use your up arrow to bring them to the command prompt
- open -a "Sublime Text" dog.txt will open the file in Sublime Text (substitute your code editor) if it is installed on your machine
- Command + KClears the console's screen
- Control + Z to pause a process and put it in the background; you can resume it later with the fg command
Most Dangerous Terminal Command
Here Be Dragons

Far and away the most destructive command you could ever type into the Terminal is rm -rf /* because that tells the Terminal to delete (rm i.e ReMove) the Root Directory and all of its sub-directories from your machine or delete every single file on the entire computer's hard drive starting from the root
The flag -rf tells the computer to carry out the command forcefully and recursively -r (Recursive): Tells the command to look inside directories and delete all their contents (files and sub-directories) -f (Force): Tells the command to ignore read only files and to never prompt for confirmation, even if a file is write-protected
The asterisk overrides the the Linux/Unix kernel failsafe for this command because if you run rm -rf /> without the asterisk the output will be
- rm: rf is dangerous to operate recursively on '/'
- use--no-preserve-root to override this failsafe
and that is where the asterisk comes into play as it will override the failsafe
Unlike the Graphical User Interface (GUI) in Windows, Mac, and even Ubuntu the command line interface (CLI) rarely asks for confirmation when you instruct it to delete, remove or destroy files and/or directories/folders on your machine and there is no "undo" function or command + Z and there is no Trash Folder or Re-Cycle Bin
Once the Terminal deletes something its irretrievably gone
Be extremely careful of typos as rm looks a little like ren or mv as typo can cause unintended consequences
And be extremely careful when you paste anything into the Command Line/Terminal Most often this horribly, dangerous command rm -rf /* is inadvertently pasted at the prompt in the Terminal
We use forward slashes (/) a lot working in the Terminal but a good rule of thumb is to never, EVER run a command where the forward slash is left alone at the end of a command with a space on ether side of it
One of the most frequently used terminal commands is rm -rf ~/.Trash/* and it is a perfectly safe command to run in your console as long as you look hard at it and look hrd at it twice to make sure ther are no typos
The command rm -rf ~/.Trash/* simply deletes all files and folders located inside your personal Trash Directory
Here is a quick breakdown of exactly what each part of the command does:
- rm: Short for "remove," this is the standard terminal command for deleting files
- r (recursive): This tells the command to delete folders and their entire contents, working its way through all nested sub-directories
- f (force): This forces the terminal to delete files without prompting you to confirm each deletion or asking for permission
- ~/.Trash/*: This is the file path directing the command to your personal user account. The ~ represents your home directory, .Trash is the hidden folder where your trashed items live
- And the * acts as a wildcard meaning "everything inside this folder
The rm -rf command forcibly deletes everything it is pointed to without asking for confirmation. If you accidentally add a single space (e.g., typing rm -rf ~/.Trash / instead of ~/.Trash/*), you could accidentally delete your entire hard drive
A good way to play around with this command is inside an OS like Ubuntu on a Virtual Machine
General Commands Manual (GCM)
RTFM
In the Terminal type man followed by a command to open the General Commands Manual (GCM) Man Page for that command
So if you wanted to know more about the ls command, you could run the command: man ls and the terminal will spit out everything you could ever want to know about the list command
On General Commands Manual (GCM) Man Pages you use the arrow keys to scroll up and down and the space bar to page down and press the letter "g" to go back to the beginning and shift/g (capitol G) to go to the end
You can search any Man Page by typing a forward slash (/) followed by your search term and hit Enter and the first instance of your term will be shown and highlighted so to see the next instance of your search term press the "n" key
When you are in a Man Page you can press the letter "h" (help) for learning about GCM Man Pages and then type "q" to go back to the Man Page you were on and then "q" again to get back to the Command Line
You can use man to pull up specs on any terminal command except what are called the built-in commands which are commands like cd or jobs or echo all of which have a single Man Page which you can get to by typing man builtins or man builtin and the Enter key
Once you've finished looking through the built-ins Man Page you can type the letter q to quit and go back to the Command Prompt
When you run a man ls or man rm or man (any other) command you'll find that you no longer have the old familiar blinking curser at the end of your prompt instead you'll see the highlighted word END in parenthesis followed by a blinking curser and way to exit the General Commands Manual is to type the letter "q" - no Enter/Return key required and that will take you back to the Command Line
You can also use control + z which will also take you back to the command prompt but that command only suspends the General Commands Manual (GCM) leaving it still running in the background and to go back to the GCM just type fg and BAM! You're back in the manual
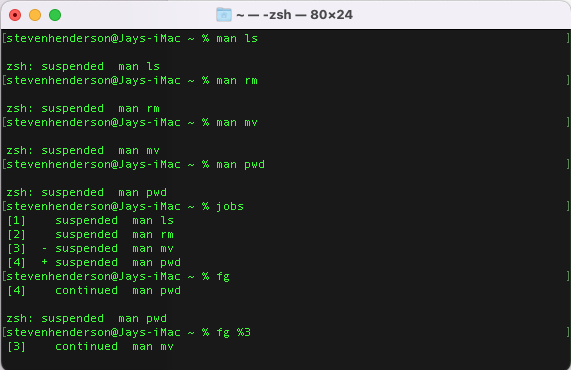
Now try this: run the man on any command you want let's say you run man rm and then suspend out of it with control z and run another man command for instance man pwd and then control + z out of that one too
So now you are back to the familiar prompt and you can change directories, copy or delete or move around files working on the Command Line as you normal would but unseen on the console there are still those two processes running in the background
To see those running processes type jobs and hit Return/Enter and the output will be
- [1] - suspended man rm
- [2] + suspended man pwd
To to go to back to the GCM on pwd type fg %2 or run fg %1 to go back to the information on the remove command
If you type just fg with no percent flag the Terminal will output the manual on the last job on the list or the last job you called up on the jobs list
Mouse over the illustration above and you'll see I used the command fg and got output on the last job on the list which was pwd Print Working Directory command and after that I ran fg %3 and got the manual on the mv or move/rename files command
You can have as many instances of the GCM running in the backgorund as you want and this can be very handy when you want to check for instance which flag to use to see hidden files like .git and as the GCM will tell you you can find those hidden files by running li -a
In the illustration above you can see I have four GCM jobs running while I'm working on the command line so if I need to be reminded of which arguments (flags) are needed to output specific information I don't have to leave the Terminal and open up a browser and google around for half an hour when I can just run fg %4 and RTFM on the fourth command on the list
Thanks for the visit